Each year I watch the talks at the Chaos Communication Congress and feel especially inspired by @ioerror and @RogerDingledine talking about the Tor network. “The Onion Router” (Tor) is an Internet anonymity tool that allow to establish network connections without the recipient knowing who his communication partner is. More information why Tor is increasingly important in todays world of mass surveillance can be found in the following resources:
- Tor Project: Tor: Overview
- Youtube: Anti-Censorship & Transparency – Roger Dingledine
- 29c3 Video: The Tor software ecosystem
- Wikipedia: Tor (anonymity network)
The Tor network is based on several relay nodes that will simply forward traffic. Regular relays forward only within the Tor network and are generally ok to run. Exit nodes are used to connect the Tor network to the regular Internet. However, since also bad people are using the Tor network, those bad people may than do bad things using the IP address of the exit node. Therefore, you have to think twice before actually running an exit node on your NAS.
Apart from that there is also the question if a relay behind your dial up connection with your IP address changing regularly. Have a read of Are short-lived relays useful to the Tor network? and then decide for yourself.
If you are convinced, that running a Tor relay on your QNAP NAS is worth the time, then please read on. Otherwise, please consider contributing to Tor in another way.
Installing OptWare
To do the following, you will need to have “OptWare” installed. Do that in the “QPKG Center” in the QNAP Webinterface. After installing it, you have to enable it. Furthermore, please enable the SSH access to your device.
Setting up the Build Environment
To build your own code on the QNAP, you will need compilers and other handy stuff. So first of all, log into your NAS via SSH:
$ ssh admin@NAS
Now install all necessary packages
$ ipkg update
$ ipkg install optware-devel make autoconf libtool automake gcc perl grep gawk popt sed
This will take a while, but it is worth the wait. Now, I had to do a couple of additional steps to get anything to build.
Fix automake to avoid using threads in Perl
Open /opt/share/automake-1.12/Automake/Config.pm and set perl_threads to 0.
$ vim /opt/share/automake-1.12/Automake/Config.pm
Go to line 35 and change it to match this:
our $perl_threads = 0;
Fix autoconf to use the correct path to automake
Open /opt/bin/automake and modify the path to automake.
$ vim /opt/bin/automake
And now change line 5228 to match the following:
my $traces = ($ENV{AUTOCONF} || '/opt/bin/autoconf') . " ";
Set a proper working path
This step is necessary, since the default PATH setting lets all tools look first in /bin and /sbin. However, the busybox tools setting there do not have the functionality that we need and many build scripts, etc. will fail. Therefore, open /etc/profile in your editor and navigate to line 52.
$ vim /etc/profile
Make sure, that /opt/bin and /opt/sbin are prepended to the PATH. To put it simple, make the line look like this:
export PATH=/opt/bin:/opt/sbin:$PATH
Install the Tor dependencies
Tor is based on crypto, so it does not openssl. Furthermore, libevent seems to the something Tor definitely needs.
ipkg install openssl-dev openssl libevent
Download Tor
Go to https://www.torproject.org/download/download.html.en and download the latest version of the Tor source code. At the time of writing this post, the latest version is 0.2.4.20.
Download it to your computer and then copy it over to your NAS. Please do not use wget on your NAS to download tor directly. The NAS does not have the ca-certificates installed which means that it cannot verify the server identity. Therefore, you cannot be sure if the downloaded version of tor is genuine. Since you can never be sure, the proper way is to verify the signature of the downloaded tor archive.
Once you have tor on your NAS, extract it:
tar -xvzf tor-0.2.4.20.tar.gz
Build Tor
Building tor is simple. After installing the depedencies, configure should be run as follows:
PATH=/opt/bin:${PATH} ./configure --with-libevent-dir=/opt/lib --with-openssl-dir=/opt/lib --prefix=/opt --disable-asciidoc --disable-gcc-hardening
Why should you use the –disable-gcc-hardening option while it obviously makes things worse? By default, tor will add the compiler flags -fstack-protector-allwhich is good. Unfortunately, gcc 4.2 and 4.3 have a bug that makes binaries compiled with -fstack-protector-all compiled on ARM processors segfault when started. To overcome this, we have to give the –disable-gcc-hardening to the tor configure process.
If your configure run went well, simply build and install tor:
PATH=/opt/bin:${PATH} make
PATH=/opt/bin:${PATH} make install
Set up port forwarding
Usually, your NAS is behind your home router that NATs your network. So, we need to forward connections coming from the internet to the newly setup Tor node. How you do that depends on your router. In any case, forward port 9001 to the IP of your NAS. For my (german) AVM Fritz Box the setup looks like this: 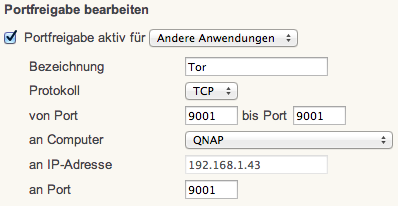
Configure your Tor relay
Create the file /opt/etc/tor/torrc and copy&paste the following example config file:
Nickname changeme
ContactInfo changemes Hostmaster <your_email_address>
# Address your_dnyndns_name.dyndns.org

RelayBandwidthRate 625 KB  # Throttle traffic to 625KB/s (5000Kbps)
RelayBandwidthBurst 1000 KB # But allow bursts up to 1000KB/s (8000Kbps)

Log notice file /opt/var/log/tor/notices.log
ExitPolicy reject *:* # no exits allowed
DataDirectory /opt/var/lib/tor
# RunAsDaemon 1
ORPort 9001
You will probably want to change a few things:
- Nickname is a human-readable name for your relay.
- ContactInfo gives the Tor community a way to reach you in case there is a problem with your relay.
- Address specifies the DNS name of your router. In case you have setup a dynamic DNS service, please enter the name here.
- RelayBandwidthRate is the bandwidth in kilobytes per second that you want to devote to Tor. Please keep in mind, that usually the upstream of your home DSL connection is the bottleneck and you should not give everything to Tor!
- ORPort is the port you setup the port forwarding for. You can use another port, but this has to be reflected in the torrc config and in the port forwarding in your home router.
Create a separate user for tor
Tor should never run as the root user and it actually warns you if you still do it. To be safe, we will create a separate user for the Tor daemon:
adduser -h /opt/var/lib/tor -D -H tor
chown -R tor /opt/var/lib/tor
You should also create a directory for logfiles:
mkdir -p /opt/var/log/tor
chown -R tor /opt/var/log/tor
Start Tor for the first time
Starting Tor is simple:
su tor -c tor
It should say something like:
Jan 02 11:28:31.530 [notice] Tor v0.2.4.20 running on Linux with Libevent 2.0.20-stable and OpenSSL 0.9.8v.
Jan 02 11:28:31.531 [notice] Tor can't help you if you use it wrong! Learn how to be safe at https://www.torproject.org/download/download#warning
Jan 02 11:28:31.531 [notice] Read configuration file "/opt/etc/tor/torrc".
Jan 02 11:28:31.565 [notice] Opening Socks listener on 127.0.0.1:9050
Jan 02 11:28:31.565 [notice] Opening OR listener on 0.0.0.0:9001
Jan 02 11:28:31.000 [notice] Parsing GEOIP IPv4 file /opt/share/tor/geoip.
Jan 02 11:28:32.000 [notice] Parsing GEOIP IPv6 file /opt/share/tor/geoip6.
Jan 02 11:28:33.000 [notice] Configured to measure statistics. Look for the *-stats files that will first be written to the data directory in 24 hours from now.
Jan 02 11:28:33.000 [notice] Your OpenSSL version seems to be 0.9.8v. We recommend 1.0.0 or later.
Jan 02 11:28:35.000 [notice] Your Tor server's identity key fingerprint is 'XXX'
Jan 02 11:28:36.000 [notice] Guessed our IP address as YYY (source: ZZZ).
Jan 02 11:28:36.000 [notice] Circuit handshake stats since last time: 0/0 TAP, 0/0 NTor.
Jan 02 11:28:36.000 [notice] Bootstrapped 5%: Connecting to directory server.
Jan 02 11:28:36.000 [notice] Bootstrapped 10%: Finishing handshake with directory server.
Jan 02 11:28:36.000 [notice] We weren't able to find support for all of the TLS ciphersuites that we wanted to advertise. This won't hurt security, but it might make your Tor (if run as a client) more easy for censors to block.
Jan 02 11:28:36.000 [notice] To correct this, use a more recent OpenSSL, built without disabling any secure ciphers or features.
Jan 02 11:28:37.000 [notice] Bootstrapped 15%: Establishing an encrypted directory connection.
...
Jan 02 11:28:54.000 [notice] We now have enough directory information to build circuits.
Jan 02 11:28:54.000 [notice] Bootstrapped 80%: Connecting to the Tor network.
Jan 02 11:28:55.000 [notice] Bootstrapped 85%: Finishing handshake with first hop.
Jan 02 11:28:55.000 [notice] Bootstrapped 90%: Establishing a Tor circuit.
Jan 02 11:28:57.000 [notice] Tor has successfully opened a circuit. Looks like client functionality is working.
Jan 02 11:28:57.000 [notice] Bootstrapped 100%: Done.
Jan 02 11:28:57.000 [notice] Now checking whether ORPort YYY:9001 is reachable... (this may take up to 20 minutes -- look for log messages indicating success)
Jan 02 11:29:39.000 [notice] Self-testing indicates your ORPort is reachable from the outside. Excellent. Publishing server descriptor.
Jan 02 11:29:41.000 [notice] Performing bandwidth self-test...done.
If Tor finds a problem for example with your port forwarding it will tell you.
Making Tor start automatically on startup
First of all you will need a file that is automatically executed when your QNAP NAS boots. I have already explained how this can be done in another blog post. Once you have your /share/MD0_DATA/.qpkg/autorun/autorun.sh file, simply add the following line to it:
su tor -c tor
All that is left to do know is to make Tor run as a daemon. To do this, edit your /opt/etc/tor/torrc and remove the # from the “RunAsDaemon” line:
RunAsDaemon 1
Pingback: Ichidan Is a Shodan-Like Search Engine for the Dark Web – L Technology Group MSSP (Managed Security Service Provider)
Pingback: Ichidan暗网Shodan搜索引擎 | 95CN Security